Circle Orboros vs. Legion of Everblight – Cat Fight!
Circle Orboros vs. Legion of Everblight – Cat Fight!, 750 pts.
Wednesday, July 18, 2007
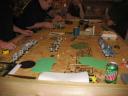
This week one of the local players and I threw down in a 750-point Hordes smackdown. I hadn’t gotten the chance to play him much yet other than in a large multiplayer game so looked forward to the opportunity. We both brought out one of the ladies of Hordes and set them at each other in a fury-filled cat fight.
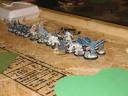
Circle Orboros (Matt)
-
 Kaya
Kaya - Trueblood Warpwolf
- Warpwolf x2
- Gorax
- Tharn Ravagers
- Tharn Bloodtrackers
- Druids of Oboros
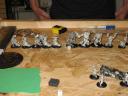
Legion of Everblight (Myself)
- Rhyas
- Carnivean
- Seraph
- Nephilim Soldier
- Shredder x2
- Forsaken x2
- Warmongers
- Blighted Archers
- Blighted Swordsmen
- Swamp Gobber Bellows Crew
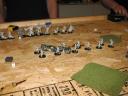
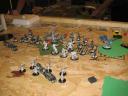
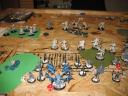
The table was pretty open. There were a pair of forests off to the left, one edging back into my deployment area and one about six inches out of Matt’s. There was also a pair of small hills, one just to the right of the center of the table and one a few inches back off to the right. Finally a pair of linear obstructions where placed near the hills, one back near Matt’s advance deployment line.
I won the initiative roll and decided to go first to try and get the first strike. Rhyas was placed front and center on my lines flanked and trailed by the unit of Warmongers. The large based beasts were set to either side of the ‘mongers, Seraph to my left and Carnivean to my right. I placed the Nephilim Soldier just to the right of the Carniviean, then deployed the Archers to his right outside of the mongers’ abomination range. The Forsaken were arranged behind my lines and the Gobbers were thrown in the back (out of Forsaken abomination range).
Matt countered by setting Kaya and his beasts in the center of his deployment area right up front. The Ravagers were deployed off to the left of the beasts near the woods and the Druids just to the right of the beasts. The Bloodtrackers were deployed in the middle of the table a few inches back from max AD. They selected the Carnivean as their prey.
Turn 1
Legion
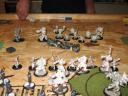
My first goal was pretty simple – kill the bloodtrackers before they could rip into my heavy. Matt had wisely set them back so that the Archers couldn’t drop a pie plate on them, but he forgot about Dash. So this game started like most of my Rhyas games – Rapport on the Carnivean, Dash, and walk 8″ up the table. I could have charged his lines for extra distance, but I wanted to be able to run the Warmongers in front of Rhyas to screen her. I was able to get her to toe a hill, though, bumping her defense up to 18 against shooting.
Next the Archers moved up the field, the extra inch from Dash letting them get close enough to have the front few drop a 4″ AOE on four blootrackers, knocking them off the table. The Warmongers then ran up field and the Swordsmen filled in the space behind and to the left of them. The Seraph flew over to the woods for some concealment, the Nephilim moved up next to Rhyas, and the Carnivean waltzed up the hill to stare down his hunters and put his animus on himself. The Forsaken then angled away from the archers and swamp gobbers and drew 3 Fury of each beast. The Shredders moved up the center, putting Tenacity on the Warmonger leader and Rhyas. Finally the gobbers advanced and tossed their 5″AOE in front of the Carnivean, blocking the Bloodtrackers’ LOS and denying them an ambuscade against it.
Circle
The Druids went first, advancing and throwing a Devouring at my Warmongers. Although there was no crit Matt put an average of four damage on the front right three Warmongers, starting to whittle them down. Unhappy about loosing his Ambuscade on the Carnivean, Matt had the bloodtrackers ambuscade my swordsmen. The plan was pretty clear… kill six swordsmen with thrown spears and then tie up my warmongers to keep them from advancing on my turn. Unfortunately the bloodtrackers failed their command check when they got within Abomination range of the Warmongers and quickly changed their minds about the fight. Kaya put stealth on the Druids then she and the beasts advanced and the Ravagers ran for the first forest before Matt ended his turn.
Turn 2
Legion
Looking at the table, it seemed pretty clear my goal was to try and stay away from the Tharn side of the table while continuing to whittle down Matt’s forces. I decided to try and damage the druids and finish off the bloodtrackers then poise myself for next turn.
The Archers led and advanced, one shooting a Druid to get range (missing due to stealth but I just needed the measurement). Six more dropped another 4″ AOE out on the table, killing three druids (but leaving the leader). The druids managed to pass their command check and decided to stick around.
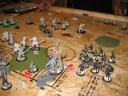
Next the warmongers spread out and started whacking at the Bloodtrackers, even though it meant some might attack each other. By the end of their activation they had beat up their brothers a bit (all except the leader were at around 5-6 damage) but they had wiped the Bloodtrackers off the board.
At this point I decided to prep for next turn. The swordsmen and Seraph backed away from the Tharn flank, shifting towards the middle a bit. They moved back enough to be able to get a charge off on anyone who engaged the warmongers. The Carnivean moved up on the right and the Gobbers dropped another smoke template in front of him to prevent the warp wolf across the table from charging him. I knew I was going to need the Carnivean on my feat turn and I had to protect it. The Shredders shifted around, one putting Tenacity on the warmonger apostle and the other just jogging around. The Forsaken picked up a few more fury points, getting one to 4 and the other to 5 while leaving 3 on the table for Rhyas. Rhays herself held her position and shed two fury (she had upkept Rapport), leaving her with 2.
Circle
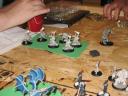
As expected the Tharn charged my lines, killing two warmongers and a swordsman. The druids advanced and threw another devouring, damaging the right two non-leader warmongers. The rightmost Warpwolf had the Gorax use its animus on it then warped for speed and charged the warmongers, killing the untouched leader and exposing my flaw – too much room between the lines. The Pureblood warped for spirit hunter (no free strikes) and ran across the table. Kaya then walked up and Spirit Doored to within 2 inches of Rhyas.
Kaya’s a MAT 6 and Rhyas base DEF is 16, but with Tenacity that raises to 17. Matt boosted Kayas first attack and rolled 4-4-2, which was a miss… until I realized I had forgotten to have the left Shredder put Tenacity on Rhays. So not only did Kaya hit, she critted, knocking Rhyas down. *sigh*
Between the free transfer from Rapport and the two Fury on Rhyas I came within two damage points of living. Unfortunately none of Kaya’s damage rolls were high enough for me to transfer and kill my right Shredder for that extra Fury point that would have let me live. Matt’s below average damage rolls actually worked for him in that regard oddly enough.
Summation
It was good to finally get in a game against Circle at this level and Kaya in particular. It’s hard to gauge things like Spirit Door’s range and effectiveness perfectly until you see it on the table and I finally was able to. I made a pretty big mistake forgetting Tenacity on Rhyas but that’s how most games go – someone makes a mistake and the other player takes advantage.
I feel pretty confident that had Rhyas survived I would have had a good chance at taking the game even if Kaya hadn’t Spirit Doored in. With my troops positioned where they were I could have strafed a few Ravagers and sent my blooded troops and beasts (as well as Rhyas) at his beasts, building a point discrepancy I think I could have held to the end. But alas it was not to be. ![]()