Bloodstone Marches – The Escape
 The Escape (Castle of the Keys)
Sunday, October 28th, 2007
After their victory over the dragon Pyromalfic, Everblight’s escape required his scattered forces to escape the ruins and regroup. Thagrosh had located a promising escape route through an unstable tunnel below the ruins and lead what forces were nearby away from the castle. Before the blighted forces could completely withdraw they were sensed by Balder, who quickly gathered what constructs were nearby in an attempt to cut off the dragonspawn’s escape.
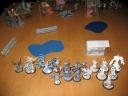
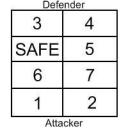 The Escape is the Legion’s second Strategic Objective of the Bloodstone Marches theater of war, and the first fight of our second round. Although the victory conditions were the same as a standard assassination game, the fight was contemplated by the unstable cavern it took place in. To represent this the table was divided into 8 12″ x 18″ segments as shown here. During the Legion player’s Maintenance Phase he would check for a cave-in by rolling a d6 for each section, starting with section 1. If the roll was a 6, that section would suffer a cave-in at the start of the Legion player’s next Maintenance Phase and stop checking sections for that turn. When a section suffers a cave-in every model in that area suffers a POW 15 damage roll and is knocked down. All terrain is removed from the section and the entire section becomes rough terrain.
As with the rest of the campaign proxies were allowed, and Saultydog took the opportunity to let a Warpwolf stand in for the second Woldwarden which is currently in pieces on his painting desk. I was hoping he wouldn’t pick up a second one but it’s not like it’s unexpected. I hate those stoopit things.
Everblight – Myself
- Thagrosh, Prophet of Everblight
- Carnivean x2
- Nephilim Soldier
- Seraph
- Harrier
- Totem Hunter
- Raptors x5
- Warmongers x5
Circle Orboros – Saultydog
- Baldur the Stonecleaver
- Woldwarden x2 (One proxied by a Warpwolf, referred to as the Wolfwarden for clarity from here on out)
- Woldwatcher x2
- Alten Ashley
- Druids of Orboros
- Sentry Stones x2 (Proxied by Machinewraiths, Mannikin by Pirates)
- Shifting Stones x2
- Tharn Wolf Riders x4
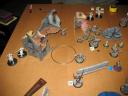
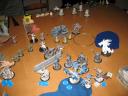
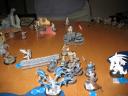
Saultydog split his deployment, centering his line with Baldur and a Woldwarden. Each flank got two Tharn Wolf Riders, the Wolfwarden was placed between Balder and a nearby structure and the Druids crowded together to the other side of Baldur.
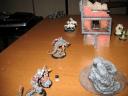
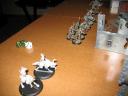
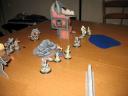
I started with Thagrosh and the Warmongers center in my deployment zone. The Totem Hunter and my winged beasts went out on the left flank while the Raptors went out to the right. Each flank also got a Carnivean.
For his Advance Deployment, Saultydog surrounded each of his Sentry Stones with a unit of Shifting Stones. The Wold Watchers were then put in the center and left flank. My Totem Hunter is nominated as the target for the Tharn Wolf Rider’s The Hunt ability.
Turn 1
Everblight
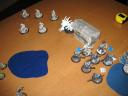
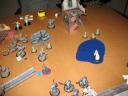
The first round of rolling for cave-in turned up one in area 5, where Saultydog had placed some of his advanced deployment.
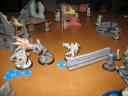
The Wagmongers lead off the turn by running forward to be my ablative shield. Each Carnivean advanced forward 6″ and cast Spiny Growth on itself just in case. The Nepilim ran forward, circling around the edge of the structure at the front of my deployment zone to free up lanes to charge as needed.
In order to help get Thagrosh up field, the Seraph used Slipstream before joining the left Carnivean in the shallow water. Thagrosh himself then advanced behind the Warmongers, cast Death Shroud, cast Draconic Blessing, then cast Tenacity.
The Totem Hunger ran forward to find cover behind the left linear obstacle and the Raptors ran out and up the right flank. Thagrosh’s Harrier brought up the rear, staying safe as a True Strike battery should.
After taking pictures for the round, we noticed that Thagrosh had somehow managed to cast Tenacity despite not fielding a Shredder. It was surprising how habitual using that animus had become for me.
Circle Orboros
Saultydog starts by placing a Mannequin for each Sentry Stone, putting them as far forward from their stone as possible. The right Shifting Stones teleported the Sentry Stone that had been deployed between them forward, managing to get it out of the section that would collapse at the start of my next Maintenance Phase. It then used Devour Magic, pulling a Fury point off of the right Carnivean but failing to pull one from the Nephilim. That Stone’s Mannikin then activates and advances, spraying two of my Raptors (including the leader). Even with a boost the leader is missed but the non-leader dies to unboosted rolls.
In the center of the field, the second unit of Shifting Stones teleported the second Sentry Stone forward as well. That Sentry Stone repeated the process, pulling a Fury Point from the Seraph, Nephilim, and left Carnivean. That Sentry’s Mannikin sprayed two Warmongers and Thagrosh. It missed the warlock but got boosted damage rolls on the Warmongers, doing 2 points to one and 0 to the other but leaving a Fury point on the Sentry Stone.
The Left Woldwatcher advanced on the Totem Hunter and shot, but was out of Baulder’s control area and couldn’t boost. The construct had managed to get within Stealth range but couldn’t hit the Totem Hunter’s Defense behind cover. The other Woldwatcher was Riled then Ran across the center line of the table, out of the cave-in area. The Woldwarden was Riled and Trampled forward for distance while the Wolfwarden advanced to the edge of the cave-in and waited.
After the Druids of Orboros ran up the center of the table Baulder advanced, put Stoneskin on the Woldwarden, then placed a forest out in front of Alten since the Monster Hunter didn’t have a shot anyway. Alten then back a bit to keep some distance between himself and my army. Finally the Wolf Riders ran, the left group heading up their flank while the right group circled back to the center of the Circle deployment zone since the area in front of them was about to collapse.
Turn 2
Everblight
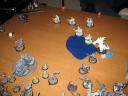
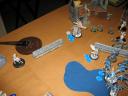
At the beginning of the Everblight turn, table section 5 suffered a cave-in. The only models in the area were Saulty Dog’s right Shifting Stone unit. One stone was buried completely but the other two only suffered 2 and 3 points of damage. We then rolled for next round’s cave-in and the dice determined there wouldn’t be one.
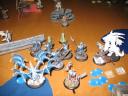
Thagrosh was only able to Leech up to 5 Fury after the Sentry Stones consumed Fury from his beast, including the 1 from his Athanc. He spent 1 of his Fury to upkeep Draconic Blessing. The Warmongers advanced to engage the two Sentry Stones. Two of them did 6 points of damage to the left Sentry but the one that engaged the right Sentry failed to break armor. On the right side of the table, the Carnivean and the Raptors (both able to ignore rough terrain) took care of the Shifting and Sentry stones on that flank, then the Raptors used their second move to circled wide of the Wolfwarden and continue heading up the table.
The Warmongers had blocked the Nephilim’s LOS to the Sentry Stone as well as fenced him in. I wanted him on the other side of the table but models were in the way. So I declared a charge on my Carnivean. The Nephilim’s Glide ability says he may move over models on a charge. So I moved in such a way that I chose to pass over the first couple Warmongers, then chose not to pass over the third. The Nephilim stopped there, failing his charge in the center of the table. He was facing my left flank instead of forward, but at least he was where I wanted him.
The Totem hunter advances up to the wall to try to engage the Woldwater but misses. Since he’s not engaged, the Seraph advances a little and shoots him, halving his damage grid and taking out his mind. The left Carnivean advances up beside the wall (blocking the Wolf Riders access to the Totem Hunter) and sprays the Woldwatcher but misses. Thagrosh finally activates, stays put, throws up Death Shroud, sits on 1 Fury, and ends the turn.
Circle Orboros
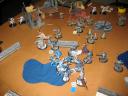
Baldur’s constructs start going to work on the Legion forces. The Wolfwarden advances up field and throws an Earth Spikes at one of the Raptors, boosting to hit and kill it. Then the left Woldwatcher advances, attacks the Totem Hunter over the wall, and kills it (The Hunt gets moved to Thagrosh). We forgot about the forest part of his attack, though, which would impact my next turn. The Sentry Stone consumes Fury again, taking it from the Seraph, Nephilim, and the left Carnivean then its spawned Mannikin gets into position to spray the Nephilim, Seraph, and a Warmonger. Saultydog chooses to save his fury for boosting damage, hitting the Seraph for 4, Warmonger for 3, and but missing the Nephilim and leaving a Fury on the stone. Then the Woldwarden advances and Earth Spikes the Seraph, criting to get the knockdown, doing 8 damage, and taking out the beast’s Mind. The right Woldwatcher advances towards the knocked down Seraph and tries to shoot it, but is just out of range.
Alten Ashely popped the Carnivean’s Spirit before the Druids walked up and tried to Devour the greater dragonspawn. They did a few points of damage but didn’t get the crit they needed. Finally the Wolf Riders go. The two on the left flank advance and flank the Legion lines while the two in the back advance and throw their spears at the Nephilim over the wall. Only one hits, but fails to break the Nephilim’s ARM. Finally Baulder advances, cast Stone Skin on the right Woldwatcher, puts a forest down, and Feats.
Insert “forgot pictures” comment here. Dammit. :/
Turn 3
Everblight
There’s no cave-in this turn and rolling determined there wouldn’t be one next turn either.
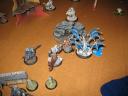
Balder’s feat was going to keep me from getting all the charges I would have wanted, but I was going to have to do what I could. Thagrosh leeched up to full fury, cut himself for the couple the Sentry Stone cost him, dropped Draconic Blessing, activates, cast Death Shroud, heals the Carnivean’s Spirit, the Seraph Mind for 2, and sits on 1 Fury. The Seraph sacrifices its movement to stand up with the flaking Wolves in its front arc and boost an attack and damage roll to kill the leader.
The left Carnivean sidesteps around Balder’s feat and sprays the Druids, killing 3 Druids (but not the leader). They boxcar their first CMD check and turn to flee. That Carnivean then puts Spiny Growth on itself. Next was where the missing forest caused us to misplay something. The Nephilim charged the Woldwatcher, going at a path that would take it perpendicular to Baldur. He boosted his to hit roll, then bought another attack and finished the Watcher off. However Nephilim can charge over models but not terrain – he wouldn’t have been able to do that with the forest in place. I think the beast had enough movement that it would have been able to engage the Woldwatcher and could have used the Fury it charged with to just boost damage, but still it was a mistake we missed while playing.
The Raptors run around Balder’s control area to get behind him while the Warmongers finish off the last Sentry Stone (and that one then whacks his friend for 6 damage). Finally the left Carnivean advances to the edge of Baulder’s control area and the Harrier sits in back where he was.
Circle Orboros
The Druids flee from the Carnivean but rally before leaving the table. Baldur starts by having his Woldwardens go after the Carniveans. First the actual Woldwarden charge the left Carnivean, boosts (and misses) the first attack, then boost (and misses) the second attack. Then the Wolfwarden charges the right Carnivean, gets a good hit in on the charge attack, and misses the second attack. At MAT 5 vs. DEF 11, Saultydog’s dice had clearly betrayed him.
The surviving Woldwatcher advances into the midst of the Warmonger and punches one a couple times but can’t finish it off. Even with the DEF bonus for being in Melee, the Carnivean’s previously clean Body gets taken out with a single shot from Alten Ashley. The Wolf Riders in the middle of the table throw at the Nephilim but miss twice, and one behind Thagrosh moves towards him and tosses but he’s out of range. Finally the Shifting Stones move up around the Woldwatcher to block some charge lanes.

Turn 4
Everblight
A few die rolls determine that section 5 would suffer a cave-in next turn.
I decide to skip Draconic Blessing for a turn to heal up some of my beasts, figuring I can take care of the Woldwardens so they can’t retaliate. Thagrosh leeches up to full, leaving 2 Fury on the left Carnivean. I was hoping it would frenzy on the Woldwarden but unfortunately it didn’t, leaving me with a half-full beast to try to attack it with. Thagrosh activates, shifts forward a bit, casts Draconic Blessing on the right Carnivean, then spends 4 Fury healing the Carnivean’s branches and a few extra boxes on the Seraph for good measure.
The left Carnivean gets a good bite and a couple claws on the Woldwarden but leaves all three aspects operational even with forcing it up to full. However with Draconic Blessing the Right Carnivean is able to destroy the Woldwarden on it (accumulating 3 Fury in the process). The Seraph stands and shoots and destroys the right Wolf Rider up near the Nephilim, then the Nephilim advances and takes care of the left one (buying an extra attack on the Woldwarden but doing very little damage). The Harrier is the last beast to activate, uses its animus, flies back, attacks the last Wolf Rider, and boosts damage to kill it.
The Warmongers circle up on the Woldwatcher and start hacking away on it but without Draconic Blessing only succeed in a couple points here and there – no aspects are taken out. Finally the Raptors shoot the Druids who were fleeing, killing all but 1. That one flees again, and the Raptors use their post-action movement to engage him to kill him on free strikes on Circle’s turn.
Circle Orboros
The last Druid dies to a free strike when he fled at the start of Saultydog’s turn. Alten Ashely popped the Carnivean’s Spirit and the Woldwarden made a attempt to finish it off but wasn’t able.
With his forces dwindling, Saultydog put together a crafty assassination attempt. It was a long shot but he decided to go for it. With Baldur full on Fury between Leeching and Reeving the previous turn, the Shifting Stones teleported the Woldwatcher behind Thagrosh. The construct grabbed hold of the blighted ogrun, lifted him off the ground, and heaved him towards the gap between the Warmongers and the Carnivean.
Unfortunately the Carnivean was just a little too close to the Warmongers and the deviation didn’t quite go as needed. Thagrosh collided with the Carnivean instead of passing it, but did take 4 damage in the process. Not seeing any other options Baldur advanced and, hoping for good rolls, threw a couple Earth Spikes at the prone warlock but only knocked him down to 4 life left.
Turn 5
Everblight
Thagrosh leeched up to his max Fury, leaving the left Carnivean full. As expected it Frenzied and killed the Woldwarden it was engaged with. I riled the Seraph up to full and had it run forward beside Baldur and the Harrier moved up into the middle of the lake. Then the Warmongers got a run order, and the one that had been brought down to 2 wounds runs up to within 2″ of Baldur and the Seraph, turns to not be engaging the Druid, and waits. The other Warmongers ran to get out of the way.
Thagrosh activates, sacrifices his movement to stand, and casts Mutigenesis on the Ogrun. He kills it and teleports to within 2″ of Baldur with 4 Fury to spare. Initially the Seraph was moved up to let Thagrosh kill it to reave fury, but afte some quick recalculations I realized I had to roll very well and would only net 1 Fury after the 1 spent for the attack and the 1 for True Strike. So I ignored it and went for Baldur. Thagrosh used two attacks, both with True Strike and one with boosted damage to finish off the Druid.
Post Mortem
I was actually a little disappointed by this scenario. The cave-ins didn’t happen near as often or have near the impact as I was expecting. I was hoping for something a little more than the typical assassination game but that’s basically what the game boiled down to.
Saultydog’s tricky little assassination attempt was highly amusing – I almost wanted to see it succeed myself. At least I was able to get a Mutagenesis kill off though. I hadn’t been able to do that yet and wanted to see how hard it was. I had the left Carnivean positioned to come help out as necessary but I was pleased Thagrosh could do it himself.
War Chest
- Legion of Everblight: +19 VPs (30 Total)
- Circle Orboros: +1 VP (3 Total)
Result: Victory for Legion, Strategic Objective 2 complete.
Bonds: My dice are broken. I rolled 6’s for bonds on my first three beasts, getting Carnivorous and Long Leash on my Carnivean and Sick ‘Em on my Nephilim.