Makeshift Miniature Braces

Makeshift Miniature Braces

When I first started painting miniatures one of the things that was suggested was to not hold a miniature by a freshly painted area so as to not accidentally rub paint off of the model.   It’s still a practice that I follow when I can, and part of that has been coming up with a few ways to mount and hold miniatures securely without having to worry about disturbing a paint job.   Most painters develop their own methods; here are a few of mine.

Binder Clip
Binder Clip

The biggest deciding factor on how I mount my miniatures is if I base them before I paint them or after.   My usual preference is to base the model after I paint it if possible   – that means there’s no base making it harder to get my brush into the underside of the model.   I also tend to clip the pewter tab that connects a models feet and pin them to the base with brass rod.   This makes it easier for me to base them (no tab to deal with covering) and opens up some options for mounting, as shown here.

Cork Mounting
Cork Mounting

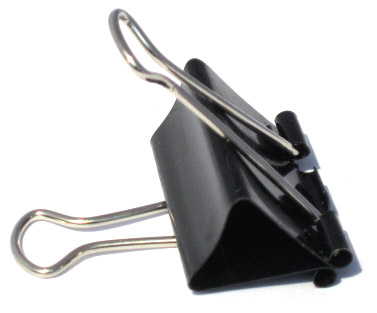
One of the quicker mounting methods is to attach a black binder clip to the pins coming out of the feet of the model.   This setup also works if I leave the pewter tab attached to the feet.   This won’t work if the feet are too far apart to be clipped and I don’t like to use it with just one foot pinned but it works well most of the time.   A very similar method is to push the pins of the model into a cork to use to hold it as seen to the left.   It works just like the binder clip, with the advantage of being able to (usually) set the model down on the cork.   The downside is that the cork can interfere with painting the bottom of the miniature, but I can always remove it for that.

Exacto Handles
Exacto Handles

For models that I only pin one foot, I’ve used the handles from Exacto knives to hold the miniature while I paint.   I’ve seen many painters that use hemostats in the same way but I don’t have any around the house and my Exacto handles work well enough for me.   Depending on the diameter of brass rod I’m pinning the model to the base with the pin may be to small for the handle but wrapping a bit of painter’s tape around each pin adds enough width for the Exacto handles to hold them securely.

Taped to a Can
Taped to a Can

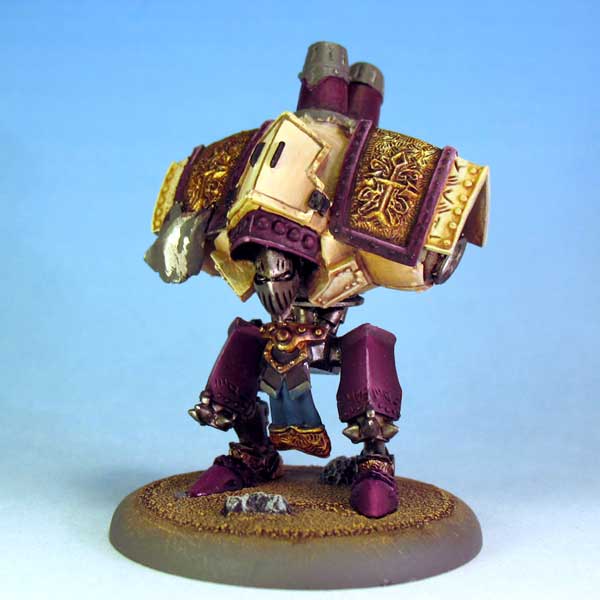
Models that have already been based can usually be held by the base itself, but that can be a bit unwieldy for larger   models (like the Legion of Everblight Seraph).   For models like that I use a few simple components to create the Super Secret Tape the Model to the Can Method.   Models like the Seraph here are still heavy enough that if I tip the can too far it will fall right off the tape, but that’s where the Kung Fu Monkey Grip comes in.   In addition to securing models I use this method regularly to hold bases while I paint them.

3rd Arm Stand
3rd Arm Stand

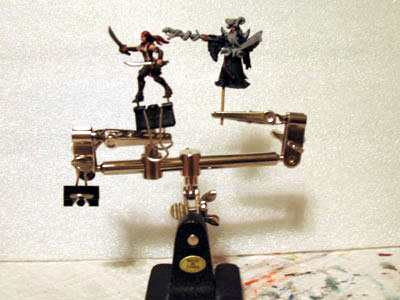
The last tool I want to mention is the 3rd arm stand that’s used by electronics aficionados to hold material that they’re soldering.   I don’t like laying miniatures down on their painted surfaces so this handy tool lets me secure them in place while they dry.   There are other ways to prop up a miniature but the advantage of the 3rd arm is that I can secure them at any odd angle, so if I’m doing a wash that I want to dry in a certain way I can leave the miniature tilted while it dries so everything stays where I want it.

That’s it – a few ways that I secure miniatures for painting.   They’re not all original but they’ve been handly little techniques to store in my painting toolbox.   I hope you’ll find one or two useful to you as well.

Impending Painting Burnout

Miniature Painting Burnout.   I can already feel it coming on but there’s nothing I can do about it.   The same thing happened last year leading up to DieCon so I shouldn’t be surprised but I was holding out hope that this year would be different.

The army I want to play for Hardcore still needs a fair bit of work, either touching up old models or finishing new ones.   Right now I think I’m happy with about half the pieces for the army but time’s quickly running out.   And if I really want the army I envisioned in the beginning that means one more big project in the last month before DieCon 09.   I really want to try it but I look at how much time I’m going to have and wonder if it’s really possible.   I know, I know… that’s not very detailed.   I’m really trying to get the whole project done as a relative surprise so I can reveal it with full-army pictures here after the Con.   You’ll just have to bear with me in the meantime. 🙂

On top of that I still have the miniatures that will be given away as part of the Privateer Press Weekend that I need to complete.   I ran into a similar problem last time I did commission work – after a while it just gets harder and harder to stay motivated to paint something I’m not going to be keeping while my own unpainted models start piling up.   I made a commitment though and I’m not backing down, but it means pushing through the burnout.

I guess this is my biggest hurdle with miniature painting.   Typically I enjoy it very much because it’s a casual hobby – I paint whatever I want at my own pace.   If burnout strikes on my own models I can just set them aside and take a breather.   Then when I get interested again I can come back to the piece in question and work on it some more.

But commitments come with deadlines and deadlines mean not stopping just because I’m tired of working on something.   If time gets short (like it is now) painting on a schedule can start to feel less like a hobby and more like work and that’s why I do it.

Still though like I said I made commitments to people and I intend to keep them.   I’m going to keep pushing through to DieCon and finish off everything I can between now and then.   It won’t be the most fun I’ve had painting but I’m determined to complete the commission to my usual standards.

After that I’ll probably put the brushes away for a while to recharge.   Maybe I’ll take that time to catch up on my online miniature gallery.   Either way it will be disappointing because I already have a backlog of miniatures I want to get painted for my own armies (in addition to some figures I just want to paint for fun) but they’re for my own collection and they’re not going anywhere.   It will be far more satisfying to wait until I can enjoy the painting process again.

In the meantime… time to buckle down and get to work!

Privateer Press Weekend 2009 Mercenaries Update

Orin Midwinter
Orin Midwinter

As work on my Legion forces progresses I’ve also been putting some work in on the Mercenaries I’m painting to be given away at Privateer Press Weekend this year.   I still have a lot of detailing and a little bit of re-working   to do but things are looking good as far as meeting my deadline.

First up is my Orin Midwinter, who I think is coming together well.   I shaded his robe by adding black to P3 Skorne Red and left him on the dark side to fit his fluff.   The trim, sash, and shoulder pads still need some work but I went with black to keep a sinister feel on the model.   Orin’s staff is P3 Brass Balls shaded with brown and black inks and highlighted by mixing in just a tad of GW Mithril Silver.

After I finish the the rest of the model I think I’m going to do some source lighting on the end of this staff and his left eye.   I have some P3 Arcane Blue that I’ll probably use – it’s an interesting greenish blue that looks like it’s good for this sort of effect.   I’ve tested it on some other models and I think it would look good applied to Orin.

Read More “Privateer Press Weekend 2009 Mercenaries Update”

Back to the Blight

The Striders' Skintones
Nyss Skintones

The past few weeks I was able to finish up my War Chiefs and get an initial sealing on them.   I have a handful of Legion models that need to have snow put on their base before a final sealing but for now on the Legion from I’ve switched gears to work on my Strider models.

Once I got started things progressed pretty quickly.   By now I have my Nyssian skin recipe down and it’s just a matter of going through the steps.   My leathers are pretty much the same recipe as I’ve always used as well but decided to switch it up.   Usually I do my highlighting by lightening the Midnight Blue I use with Dutch Blue eventually with a little white.   This time I went from Midnight Blue to Cape Cod Blue, which is a blue/gray.   The end result was a much more realistic look and I think it turned out well.

Read More “Back to the Blight”

Luke’s Legion Speed Painting Experiment

The finished result
Speed-Painted Shredder

I’ve mentioned Luke here on this blog before.   On top of being a fellow Legion of Everblight player he’s also one of the hosts of The Podge Cast, has guest hosted on the Iron Agenda, and is a former member of my weekly rpg group (and played in our Deadlands and Earthdawn games).   Needless to say Luke’s a busy guy and that’s kept his budding Legion force unpainted.

I did a little research and found a few products and after picking them up, invited Luke over after work one day to hang out and test a possible method to speed paint his Legion beasts in the color scheme that he had implied he wanted to use.   While the results   aren’t anything that will win a painting competition the process was extremely fast and the results are more than sufficient for the table top.

Read More “Luke’s Legion Speed Painting Experiment”

Protectorate Character Jacks & Jack Painting Hate

Protectorate Character Jacks & Jack Painting Hate

A while ago I mentioned that I was working on a pair of Protectorate warjacks – the Fire of Salvation and the Blessings of Vengeance.  That was December 13th and I’m pretty sure that they’re in the same state now that they were then.  The Fire of Salvation sat assembled on my painting desk for a month or two until the Blessing came out – I just didn’t feel motivated to put him together right away.  After Blessing came out I figured it was time to get them both assembled and painted.  I heard a lot of complaint about assembly of the Blessing but I honestly didn’t have much problem – it just required some dry fitting and pinning and it went together smoothly.

The weaponless Fire of Salvation
Fire of Salvation

I worked pretty hard on the models for about a month, making some pretty decent progress.  I decided to use the models to test two new things.  The first was trying a different base color for my off white areas.  I really like the Applebarrel Goosefeather color that I normally use on my Protectorate stuff but that paint’s coverage is horrible.  Normally I spend a lot of time putting down countless thinned layers of this color.  This is a very time consuming process on a small model, let alone something as large as a heavy warjack.

This time around I gave Reaper Master Series Yellowed Bone a try.  There’s a little more yellow in the color than normal but the coverage is superb.  After laying down a base coat I did a single thinned coat of Goosefeater which helped re-tint the areas more to my liking.  The end result was ever so slightly different from just using Goosefeather but was infinitely faster.  Basecoat completed, it was on to shading as normal.

The currently oddly-posed Blessing
Blessings of Vengeance

And shading was my second experiment for these models.  Once again I varied my recipe, mixing in some P3 Greatcoat Grey into my usual brown shading mix to add a little more depth to the shadows.  The first results had a bad tint to them that wasn’t what I was looking for (nor did it match the rest of my army) but I glazed the shadows a couple times with my usual brown shading mix and that was all the fix that was necessary.

Once the experimentation was over it was on to the usual of jack painting – metallics, my royal purple, and other detailing.  And it was at that point where my motivation started dwindling again.  After trying to rekindle my efforts on these models, I realized my lack of motivation is due to the fact that I just don’t like painting warjacks.  The only thing I can think of that it’s the big open spaces and the chassis that at this point are just so repetitive that working on them more of a chore than a joy.  And painting shouldn’t be a chore.

Added to that the fact that I don’t even use too many jacks to often in Warmachine and I wind up preferring to work on something that will see more use like a solo, warcaster, even something from my Legion of Everblight army.

I really want to get these models finished but unless I decide to use them at Privateer Press weekend this year I’m not sure how quickly I’ll get back to them.  I still have the scroll-work on Fire to do as well as the weapons (and some edge-work) on both jacks and they should be done.

Now if I can just get motivated to get back to work on them…

Sad Tidings

OttLite Shelby Floor Lamp
OttLite Floor Lamp

Last night as I was working on some models my work light started flickering.   I took a break to do a few things on my computer and when I came back it was completely dead.   I hadn’t really noticed how spoiled I had been by my OttLite until I tried painting without it.   I’m going to have to see if I can find an old desk lamp to use until I can get a replacement bulb.   🙁

I suppose it’s due though.   The lamp is probably about eight years old at this point and hadn’t gone out yet.   It’s been fantastic to paint by though.   If I were to go back and change anything I might go with a desk lamp instead of a floor lamp but this one has served me wonderfully since my fiancee gave it to me years ago.   The untinted white lite it puts out is perfect for painting by and I’d highly recommend one for anyone else looking for a painting light.

WIP – Mercenaries for Privateer Press Weekend

WIP – Mercenaries for Privateer Press Weekend

Experimenting with a quick wash
Wash Experiment

As I mentioned before, the local Warmachine community held Privateer Press Weekend at DieCon 8 last year here in St. Louis.  This year we’re going to be doing it again.  And like last year I’ve been tapped to paint some miniatures to be given away as door prizes to attendees.  Last year I painted up a Broadsides Bart but this year I signed up to do a trio of Mercenaries – Dougal McNaile, Thor Steinhammer, and Orin Midwinter.  Given how much of my own stuff I’d like to have done by the convention it may be a tall order but I’m going to give it a shot.

So far the work I’ve done on Dougal and Orin has been mostly preliminary stuff.  I basecoated their skin with P3 Midlund Flesh  and washed them with a diluted mix of GW Brown Ink, P3 Flesh Wash, and some glaze medium.  From there I’ll start highlighting the skin back up, but before I do that I’m going to get Thor caught up so I can do all three at once.  Dougal also got his pants based in Reaper Master Series Yellowed Bone, then I washed them with the same shade I used on both models’ exposed skin.  With a little cleanup I think it’s going to look pretty nice.

GW's Red Foundatin's Performance
GW Foundation Red

The red on Orin is from a pot of GW Foundation Red that I was given a ways back.  It’s a little thick but even watered down the paint has excellent coverage and really helped get him started.  I plan on washing his coat with a dark red/black to help define the shadow areas before I start doing any actual blending.  I plan on blending over the wash but it’ll help give me a reference point on where to start.

I’ve already mentioned the GW and P3 paint lines that I use, but they’re not the only paint lines I use.  My paint organizer has bottles from both Vallejo’s lines, Reaper Master Series, some artist paint additives and even some craft paints that still see use on my models.  Some painters will  swear by a single line and stick with it but I’m a big fan of picking and choosing to find the tools that best work with your style and your palette needs.

Chill of Winter & Shiny Paint

I haven’t decided what I want to field this year at Hardcore at Privateer Press Weekend at DieCon 9 this year – my Protectorate of Menoth or my Legion of Everblight.  Most of what I’d want to field with my Protectorate is already painted so I’m going to try and get a lot of work done on my Legion before hand so I can make the final decision.

My current project is a pair of Warmonger War Chiefs that I’m painting to match the Blighted Ogrun Warmongers that I painted back in 2007. I’ve included a couple of picture my my photography rig probably won’t be up for another week or so so the quality is pretty lacking.  I really wanted to get back to posting pictures though so it’s a start.

There’s still plenty of work to do – attaching the right arm for instance.  There’s also the bone spines on the back of the left arm which haven’t been shaded yet and are still base-coated in Reaper Master Series Yellowed Bone.  And the Ogrun’s talons and the claws on his pelt that need some work as well as some more general touch-up and detailing.

As I worked on my warmongers my biggest concern was being able to match the colors on models that I painted almost two years ago but for the most part that’s been relatively a non-issue.  I had written down the flesh colors and the armor is very strait forward; the only real issue was the fur on the boots/back but I was able to match that fairly closely to my existing Warmongers’ boots.  My recipe for doing so used a few washes with P3 Armor Wash though, which reminded me how much I hate some of the paints I also think are the easiest to use – the shiny finish.

The effect I see usually happens with either hobby paints that use liquid pigments (Reaper Master Series, Formula P3) or certain washes – that being a shiny finish on the coat of paint after applying it to the model.  The problem is easily solved at the end of the painting process during final sealing when I use Testors Dullcoat but until that time the areas that are painted with these paints are pretty reflective and can obscure detail.

These reflections make it difficult – for me at least – to pick out my own highlighting as I work which has been extremely frustrating at times.  It can be very annoying to seal a model and then realize that the paint job doesn’t actually look like I thought it did when the reflected highlights are are removed.  Even with the glossy finish good paint is good paint so I’ll stick with using the RMS and P3 lines.  The paints apply and blend too smooth and easily for me for it to be worth switching.

Although I’m concentrating on my Legion, I plan on switching gears for the next post.  I’m hoping that alternating between the groups of WIPs will help prevent burnout.  So next post I’ll provide some pictures of a different project I’m working on for DieCon, and with any luck my photo rig will be set back up and they’ll be much higher quality!

Miniature Painting – Truth or Myth?

As I speculated earlier, work on The Iron Agenda has really hurt my posting schedule here on Dankelblarg.   Fallout 3 hasn’t helped a whole lot either but podcasting has wound up consuming a lot of my free time since we started.   As a result I haven’t made as much progress painting-wise as I would have liked – and I haven’t updated Diminutive Denizens in ages -   but I have been able to get some work done since July.

Read More “Miniature Painting – Truth or Myth?”