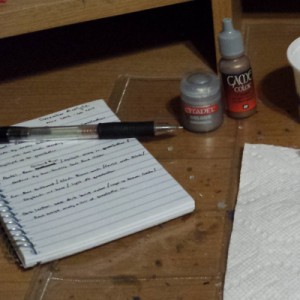
Between a sluggish painting speed and the occasional hiatus I’ve occasionally found myself at a loss when trying to remember how I painted older models. I can usually remember the technique I used but don’t always recall specifics like paint mixing ratios. Late last year I finally decided it might be a good time to start keeping a basic painting journal. There’s a number of electronic options out there, from Google Docs to a wiki (either personal hosted wiki or on a stick). At some point I’ll probably transfer most of my notes over to some sort of taggable or sortable format but for now I’ve found it most convenient to keep a small notebook and pen next to my painting area so I can jot down notes or paint recipes as needed.
Recently I’ve been experimenting with a few of the techniques that the Privateer Press painting staff talk about in their recent books. It’s taken a while to adapt to a new way of doing things but after getting used to it I’ve been able to increase the speed I can paint a figure pretty significantly.
Vice Scrutator Vindictus
The biggest change I’ve picked up on is how I layer cloth. In the past I’ve started with the darkest shadow color and slowly worked up from there layer by layer. But recently I’ve switched to basecoating with my mid-tone and shading down from that in thin coats, falling back to wet blending occasionally just to smooth out some of the larger surfaces.
Vindictus in particular only took a few days for me to do, and for me that’s faster than it usually would. If it weren’t for the filigree around the armor plates, I expect it would’ve gone even faster.
I’ve also spent some time on a reaper figure lately, using this technique primarily on her cloak. A lot of the rest of her is quick-work, but all in all, she’ll make a good RPG figure once complete.
Reaper Miniatures #2834 Deladrin, Female Assassin
I’m still refining the techniques, but for now I’m satisfied with how the figures are turning out. Soon I’ll be moving on from my recent string of Protectorate pieces to try out the wintery blues of my Legion. Between that and a few side pieces I’m working on, I should have ample opportunity to perfect the new technique.
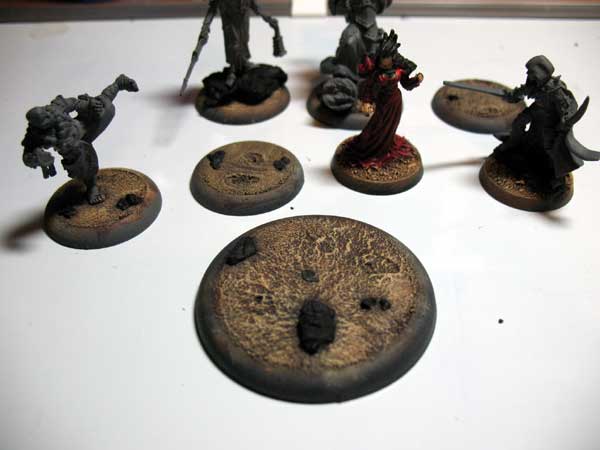
In a previous post I mentioned that I use concrete patch as a basing material. It’s an alternative to sand that’s a rock solid way to model dirt to-scale on a base. It requires a bit more effort than the traditional glue and sand but I think the end result is worth the extra work.
Base WIPs
The most difficult aspect of working with the concrete patch is that in order to attach models, you have to clip the pewter tab from the base of the figure, give it a quick filing, and pin it to the base. I’ve always preferred that method anyway, so it’s no big deal. But if you’re used to just gluing and slotting the figure, then switching to concrete patch is going to involve some extra steps.
Usually I’ll glue the pin to the miniature and drill a hole on the base, cover the base in concrete patch, and before it sets, press the miniature down where it’ll ultimately stand, and remove it. Once the concrete patch dries, the indentions left by the miniatures feet will cup them in place securely.
If you want add accessories to a base – things like small rocks, gears, or the like – the patch itself will hold them in place if you press them in before it dries. For the most part this has been all I’ll need to do, but occasionally if a piece is loose I’ll pop it up after the patch dries and glue it back down into the same divot, making it very secure. For tiny rocks made from cork I’ll just put a drop of glue over it while attached, and that is usually sufficient. I prefer superglue over craft glue for these steps.
As for painting my bases, I picked up a recipe for craft colors a few years ago that I use for all of my bases. I can’t remember the source anymore, but the combination works great. One note though, before going into painting – make sure you have an extra old brush. Drybrushing over concrete patch will ruin a brush like nothing else.I use craft paints for my bases because frankly there’s no point in wasting expensive model paints on them. Once they’re thinned slightly, they dry brush on adequately for any base and are far cheaper than higher quality alternatives. I purchased a set of 2oz. bottles of paints over two years go just for basing and I still have plenty left.
Basing Paint Range
The recipe is pretty basic. Just lay down a solid layer of Burnt Umber (or Dark Burnt Umber) and drybrush with successive layers of:
Brown Oxide
Autmn Brown
Golden Brown
Maple Sugar
If I feel I need a final layer of highlights, I’ll add a little Satin Cream to the Maple Sugar for just the lightest of dustings.
You could easily get away with buying less bottles of paint and mixing up midtones, but I don’t think it’s worth the time. Each bottle is less than $1 US, so for $5 you can buy enough shades to be able to work straight from the bottle – no wasting time mixing midtones or trying to match previous results.
After you paint the bare earth, you can add flocking and/or paint whatever additional accessories you’re adding to your base. It’s nothing fancy, but it gets the job done.
I had a request as a comment on a previous article to talk about some basic brush care tips. I’m no expert on the topic but I’ve ruined more than enough brushes to know there are a few traps to avoid in order to keep your brushes in working condition as long as you can.
Keep the Ferrule Clean
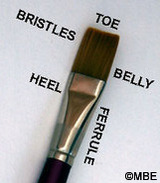
Anatomy of a Brush
The ferrule of the brush is where the bristles are glued together and held to the handle. If paint is allowed to work its way up into this area of the brush and dry, it will start pushing bristles outward and causing the tip to start losing its shape. It’s best not to dunk a brush completely in your paint when loading it up for this reason. Overloading a brush makes it harder to control the paint to begin with, but by keeping the paint limited to the tip of the brush you’ll also help keep the ferrule clean.
Clean & Condition your Brushes
Once every so often you should clean and use use brush soap (I use this) to help keep your brushes in shape. I use the soap to clean the bristles, then reshape the brushes, coat them in the conditioning soap, and let them sit overnight to condition. This process will help remove any paint from between bristles and even the occasional bit that escapes up into the ferrule as well as replace some of the oils in natural bristle brushes.
Keep the Bristles Shaped
Detail work requires a steady hand and a sharp brush. While the former can only be developed by practice, the later can be quickly lost if you don’t take care of your brush. In addition to the tips above, make sure you don’t abuse your brush when painting with it. Specifically, stippling or stabbing at a miniature with a brush is going to be a good way to ruin the tip. Drybrushing is really hard on brushes as well. That’s why most painters keep old brushes around to do their drybrushing with. I’ll occasionally run a brush perpendicular to a surface to do something like highlighting the edge of an armored plate, but for the most part make sure you’re painting by dragging the bristles along the surface without torquing them in an odd direction.
Don’t Drown Your Brush
When you store your brushes, store them either with horizontally or vertically with the bristles in the air. Never store brushes tip down. Likewise, don’t leave a brush to soak in water or cleaner bristles down either – this will mash the tip and if you leave it in long enough, start to dissolve the glue in the ferrule.
Brush Caps aren’t Trash
Most decent quality brushes you’ll buy will come with plastic sleeves that slip over the bristles. Don’t throw these away – they do a great job protecting a brush during storage or transport. If a brush is covered with one of these caps, the bristles won’t bend or become misshapen as it bounces around in a drawer, bag, or wherever you’re keeping your supplies. Even if you use a pretty safe storage device where accidents aren’t likely, it’s better to be safe than sorry.
Those are a few of the things I’ve picked up the past few years. If anyone has any other tips for painters regarding brush care and/or use, please share!
When I upgraded my brushes to Winsor & Newton Series 7‘s a few years ago, I started paying more attention to brush care. With the brushes’ higher cost, I wanted to get as much life out of them as possible. For me that meant keeping an older brush around to do my painting dirty work.
Before I started using the S7’s, I was pretty rough with my brushes. I was guilty of all of the brush sins, including things like stabbing at models sometimes with the brush and letting paint get into the ferrule regularly. While this wasn’t a big deal when I was spending a buck a brush, I knew I had to change my habits with the new brushes, but doing so would slow me down. Lets face it – when you’re base coating, dry brushing, or otherwise just trying to lay paint down quickly, doing things right takes more time.
That’s when I started going to the bargain brushes at my local art store. They’re nowhere near the quality of S7’s, but they have one distinct advantage: the el cheapo factor. For a few bucks I could pick up a couple flats for drybrushing and a few rounds for base coating work (especially for my bases; concrete patch chews up brushes quick!).
W&N S7s (left) and the throw-a-ways (right)
When it comes to layering and detail work, I stick with my good brushes, but if I’m throwing down the first layers – like the black undercoat and Boltgun base coat for metals – I can go to one of my workhorse brushes (as long as they still have a decent tip) to get the job done fast. And when I finally mutilate them past usefulness, I don’t have to feel bad about only needing to drop a couple bucks for replacements.
Once a miniature hits the table, it’s inevitably going to be subjected to the rigors of gaming. Even the most careful of gamers will have accidents. It’s painful to see hours of hard work spent painting a figure vanish in one quick tabletop accident, but that’s why most gamers seal their miniatures after painting them.
So how do you want it?
Sealants come in a variety of finishes, but for the most part they can be grouped as gloss, satin, and matte. Most people prefer a matte finish on their gaming miniatures but this brings with it a problem. Unfortunately the strength of a sealant is usually proportional with how glossy the finish is, meaning matte sealants tend to offer the least amount of protection to miniatures. This isn’t as much of an issue with a display pieces but with a model that will face the rigors of the game table it means being more susceptible to damage.
When I first started painting miniatures one of the things that was suggested was to not hold a miniature by a freshly painted area so as to not accidentally rub paint off of the model. It’s still a practice that I follow when I can, and part of that has been coming up with a few ways to mount and hold miniatures securely without having to worry about disturbing a paint job. Most painters develop their own methods; here are a few of mine.
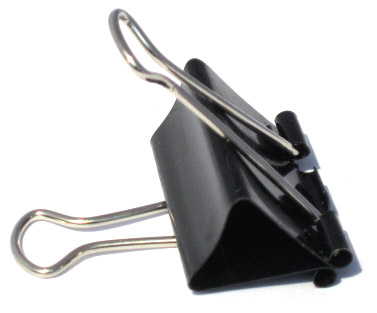
Binder Clip
The biggest deciding factor on how I mount my miniatures is if I base them before I paint them or after. My usual preference is to base the model after I paint it if possible – that means there’s no base making it harder to get my brush into the underside of the model. I also tend to clip the pewter tab that connects a models feet and pin them to the base with brass rod. This makes it easier for me to base them (no tab to deal with covering) and opens up some options for mounting, as shown here.
Cork Mounting
One of the quicker mounting methods is to attach a black binder clip to the pins coming out of the feet of the model. This setup also works if I leave the pewter tab attached to the feet. This won’t work if the feet are too far apart to be clipped and I don’t like to use it with just one foot pinned but it works well most of the time. A very similar method is to push the pins of the model into a cork to use to hold it as seen to the left. It works just like the binder clip, with the advantage of being able to (usually) set the model down on the cork. The downside is that the cork can interfere with painting the bottom of the miniature, but I can always remove it for that.
Exacto Handles
For models that I only pin one foot, I’ve used the handles from Exacto knives to hold the miniature while I paint. I’ve seen many painters that use hemostats in the same way but I don’t have any around the house and my Exacto handles work well enough for me. Depending on the diameter of brass rod I’m pinning the model to the base with the pin may be to small for the handle but wrapping a bit of painter’s tape around each pin adds enough width for the Exacto handles to hold them securely.
Taped to a Can
Models that have already been based can usually be held by the base itself, but that can be a bit unwieldy for larger models (like the Legion of Everblight Seraph). For models like that I use a few simple components to create the Super Secret Tape the Model to the Can Method. Models like the Seraph here are still heavy enough that if I tip the can too far it will fall right off the tape, but that’s where the Kung Fu Monkey Grip comes in. In addition to securing models I use this method regularly to hold bases while I paint them.
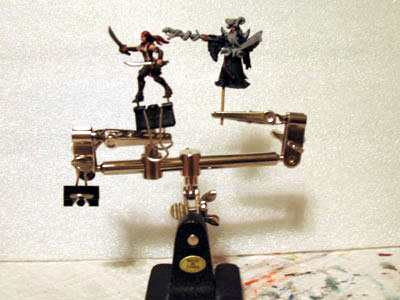
3rd Arm Stand
The last tool I want to mention is the 3rd arm stand that’s used by electronics aficionados to hold material that they’re soldering. I don’t like laying miniatures down on their painted surfaces so this handy tool lets me secure them in place while they dry. There are other ways to prop up a miniature but the advantage of the 3rd arm is that I can secure them at any odd angle, so if I’m doing a wash that I want to dry in a certain way I can leave the miniature tilted while it dries so everything stays where I want it.
That’s it – a few ways that I secure miniatures for painting. They’re not all original but they’ve been handly little techniques to store in my painting toolbox. I hope you’ll find one or two useful to you as well.


