Recently I’ve been experimenting with a few of the techniques that the Privateer Press painting staff talk about in their recent books. It’s taken a while to adapt to a new way of doing things but after getting used to it I’ve been able to increase the speed I can paint a figure pretty significantly.
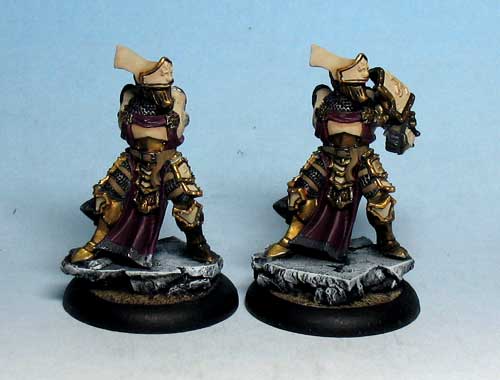
Vice Scrutator Vindictus
The biggest change I’ve picked up on is how I layer cloth. In the past I’ve started with the darkest shadow color and slowly worked up from there layer by layer. But recently I’ve switched to basecoating with my mid-tone and shading down from that in thin coats, falling back to wet blending occasionally just to smooth out some of the larger surfaces.
Vindictus in particular only took a few days for me to do, and for me that’s faster than it usually would. If it weren’t for the filigree around the armor plates, I expect it would’ve gone even faster.
I’ve also spent some time on a reaper figure lately, using this technique primarily on her cloak. A lot of the rest of her is quick-work, but all in all, she’ll make a good RPG figure once complete.
Reaper Miniatures #2834 Deladrin, Female Assassin
I’m still refining the techniques, but for now I’m satisfied with how the figures are turning out. Soon I’ll be moving on from my recent string of Protectorate pieces to try out the wintery blues of my Legion. Between that and a few side pieces I’m working on, I should have ample opportunity to perfect the new technique.
To help keep motivated after spending a fair bit of time on my exemplars’ armor, I switched up things a bit and started working on some side projects. I found a couple Hordes figures I had started to work on and forgotten about, and started work on some figures for a new RPG campaign.
The change of pace has helped me keep productive, but the subject matter isn’t really helping the problem I mentioned previously of not pushing my skill. It seems like a lot of my RPG figures tend to get rush jobs – especially the plastic ones. But at least it’s still painting; I’m building momentum. 🙂
The first couple miniatures are the Unit Attachment for the Blighted Swordsmen of the Legion of Everblight. They’ve been sitting on my desk in an almost-complete state for ages but I finally got back to working on them the other day. I’m down to the last few final details and I’ll be able to seal them.
The black-robed figure is a speed paint job for an RPG character. It’s an old plastic Games Workshop wizard figure I got years ago. He’s pretty basic (and way too rosy cheeked at the moment) but makes a good pompous little wizard.
The last figure is one that I’ve actually painted before, but I’ve gone back and rebased. I’m thinking on starting to do this on more of my figures as I get time. Since their tabs are already glued into the base it’s just a quick series of tasks:
Paint watered-down PVA glue on the base
Dip the base in sand
Paint watered-down glue over sand
Paint
Seal
Add static grass
It’s something that should be easily done while I’m waiting for other other figures to dry, and will help make some of my older figures look more ‘finished’. They never see table time other than in role-playing games where it doesn’t really matter, but I’ll be happier with them.
I’ve noted a few things before on my blog: I hate painting Exemplar and I’m suffering from brush burnout. You’d think I’d pick different a different model type for my newest project. But alas, I just started my Exemplar Errant Seneschals and Unit Attachment instead. Sometimes I wonder if something’s seriously wrong with me.
I spent a few evenings with Hulu on the laptop near my painting desk working on the models’ armor and made some decent progress. I’m still working on some more detailed shading at the moment, but I’m going back and forth between wanting to take the time to do some really detailed shading and getting burnt out working on them.
Knights Exemplar Errant Seneschals
Knights Exemplar Errant Unit Attachment
This has me thinking – I wonder if army painting is causing my abilities to stagnate. It seems like there’s less motivation to push my skill to the next step when in the back of my head I can always fall back to “Well, this just has to look as good as the rest of my models.” Might be time to shake things up a bit.
With just a couple days left before Privateer Press Weekend at DieCon X here in St. Louis, I’m still scrambling to finish a few last minute figures before Saturday’s Hardcore event. Surprise surprise, it’s down to the wire with me scrambling to finish a everything up in time. It really shouldn’t be a surprise, though. 🙂
I also have to clean up a few models and finish assembling my Exemplar Errant Seneschals in case I want to use them later in the weekend. They definitely won’t be painted for Hardcore but I might toss ’em in another list to give them a go in one of the other formats.
Despite being behind, I’m looking forward to the event. Last two years have been fantastic, and this year promises to be no exception.
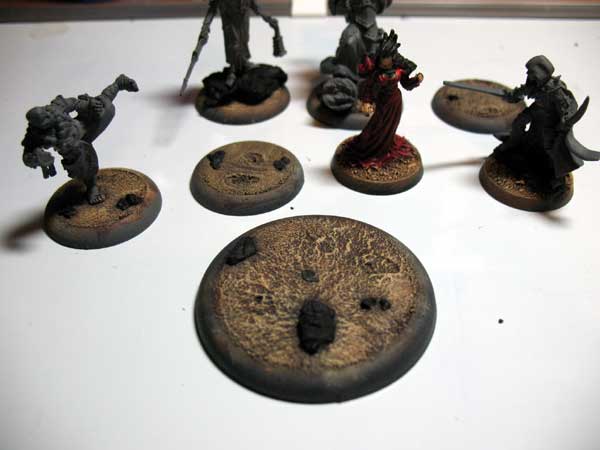
In a previous post I mentioned that I use concrete patch as a basing material. It’s an alternative to sand that’s a rock solid way to model dirt to-scale on a base. It requires a bit more effort than the traditional glue and sand but I think the end result is worth the extra work.
Base WIPs
The most difficult aspect of working with the concrete patch is that in order to attach models, you have to clip the pewter tab from the base of the figure, give it a quick filing, and pin it to the base. I’ve always preferred that method anyway, so it’s no big deal. But if you’re used to just gluing and slotting the figure, then switching to concrete patch is going to involve some extra steps.
Usually I’ll glue the pin to the miniature and drill a hole on the base, cover the base in concrete patch, and before it sets, press the miniature down where it’ll ultimately stand, and remove it. Once the concrete patch dries, the indentions left by the miniatures feet will cup them in place securely.
If you want add accessories to a base – things like small rocks, gears, or the like – the patch itself will hold them in place if you press them in before it dries. For the most part this has been all I’ll need to do, but occasionally if a piece is loose I’ll pop it up after the patch dries and glue it back down into the same divot, making it very secure. For tiny rocks made from cork I’ll just put a drop of glue over it while attached, and that is usually sufficient. I prefer superglue over craft glue for these steps.
As for painting my bases, I picked up a recipe for craft colors a few years ago that I use for all of my bases. I can’t remember the source anymore, but the combination works great. One note though, before going into painting – make sure you have an extra old brush. Drybrushing over concrete patch will ruin a brush like nothing else.I use craft paints for my bases because frankly there’s no point in wasting expensive model paints on them. Once they’re thinned slightly, they dry brush on adequately for any base and are far cheaper than higher quality alternatives. I purchased a set of 2oz. bottles of paints over two years go just for basing and I still have plenty left.
Basing Paint Range
The recipe is pretty basic. Just lay down a solid layer of Burnt Umber (or Dark Burnt Umber) and drybrush with successive layers of:
Brown Oxide
Autmn Brown
Golden Brown
Maple Sugar
If I feel I need a final layer of highlights, I’ll add a little Satin Cream to the Maple Sugar for just the lightest of dustings.
You could easily get away with buying less bottles of paint and mixing up midtones, but I don’t think it’s worth the time. Each bottle is less than $1 US, so for $5 you can buy enough shades to be able to work straight from the bottle – no wasting time mixing midtones or trying to match previous results.
After you paint the bare earth, you can add flocking and/or paint whatever additional accessories you’re adding to your base. It’s nothing fancy, but it gets the job done.
It’s already that time of year again. In a few short weeks Privateer Press Weekend at DieCon X will be upon us. This year the event will feature another Hardcore event again – the first ever official one for Warmachine MkII. There’s not much time left, but I’m behind on getting prepared. This feels oddly familiar.
I have a few lists I’m tossing around to play, but I haven’t even really settled on if I’m playing the Protectorate or Legion. The Legion models I’d want to use are already painted, but there’s still a few key Protectorate ones – like the Hierophant and Covenant – that I needed to get to.
It’s been a while since I last picked up the brush; maybe even a couple months. Painting has always been an enjoyable hobby for me, but lately it’s always seemed like there’s something else I rather do with my free time. Still there aren’t many chances to play in a Hardcore event, so it’s time to buckle down and get to work.
My painting has been progressing slowly but steadily. Nowadays it seems like I can only spend so much time with the brush before I need a break. But I recently made progress on a handful of miniatures so I figured it was time to add to my (lacking as of late) collection of WIP shots.
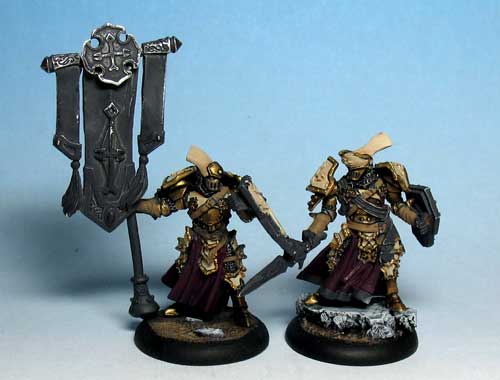
Rhoven & Honor Guard
First up is Rhoven and the Honor Guard. I posted some initial WIPs of the Honor Guard a while back and since then I’ve made some pretty good progress. The Honor Guards have actually been sitting mostly done for a little while now while I worked on Rhoven himself.
I’m most happy with the lower portion of Rhoven’s robes so far, but there’s still some work that needs to be done. I’m going to repaint the stole for starters; the highlights were pretty borked when I did them the first time. That and some more general cleanup work should make him ready for sealing.
When I sat down with my Bastions the other day to prep them for painting, I decided to knock out Rhoven’s Honor Guard at the same time. It’s been a couple years since I painted any exemplar models and I remembered I hated painting their armor, but I forgot just how time consuming it was.
I’ve been asked a few times how long it takes me to paint a model. Most of the time I don’t keep track of how much time I spend on a given model – I usually don’t want to know how many hours of my life I’ve spent on this hobby.
Usually I listen to podcasts, music, or DVD’s while I paint, and the length of one of the podcast episodes I was listening to happened to correspond to a painting step that shed a pale sickly light on how long I had been at work on my exemplars.
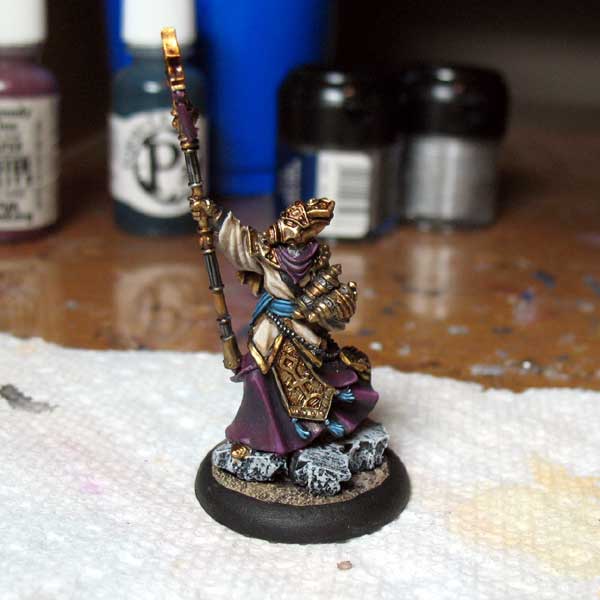
First, a little setup. Painting exemplar armor is a fairly complex process because I prime in gray. I tried priming in white on my Knights Exemplar Errant, but the time I saved on the armor plates was quickly lost in the recesses of the model. From prime to finish, my process goes something like this:
Base coat the armor Reaper Master Series Yellowed Bone (usually multiple coats).
Two light coats of Applebarrel Goosefeather.
Wash the white areas with a thinned 2:1 mix of Goosefeather and Territorial Beige.
Blackline the edge of each plate where it has a border that will be metallic.
Base coat the metallic areas in GW Boltgun Metal.
Paint the metallic areas in a 1:1 mix of Vallejo Game Color Glorious Gold and Vallejo Game Color Polished Gold.
Highlight the metallic areas with Vallejo Game Color Polished Gold.
Was the metallic areas with a mix of P3 Armor Wash and GW Brown Ink.
Touch-ups & final highlights (plates and edges).
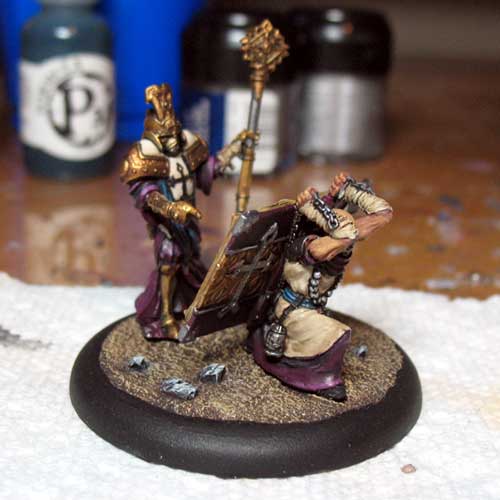
The time I spent on step 6 for all 5 Bastions and the Honor Guard pretty much corresponded with the running time of the podcast I was listening to: about 1 hour. That got my models to this point:
Exemplar WIPs
Unfortunately, I’ve been able to estimate roughly an hour per coat to get this point; so roughly 8 hours so far. And there’s still plenty left to do, including all of the purple areas after I finish cleaning up the metallics.
Aren’t you a little short for an Exemplar?
As a side note, I’ve found working on the Bastions and Honor Guard at the same time to be mildly humorous. As medium based models, the Bastions are far and away the largest models in the exemplar ranks of the Protectorate of Menoth, far huskier than any of their compatriots.
On the other hand Juviah Rhoven’s supposed Honor Guard are vertically challenged even by Knights Exemplar standards. Yet as pewter miniatures, the two Honor Guardmen weigh far more than the five Bastions.
After the rush to get my army painted for Hardcore and the disappointment of not being able to play, I decided to take a break from painting Privateer Press miniatures. I’ll come back to them soon enough but I spent the past couple weeks finishing up a handful of models for our weekly roleplaying game.
First up are a couple of Reaper figures that I picked up for two of the players. The first for a hammer-wielding fighter type. As our “knight in shining armor” I went with bright plate armor accentuated with a bright regal blue. The stock figure (Reaper 3324, Stern Kestrelmen) is armed with a sword but I swapped it out for a hammer from the Games Workshop Mordheim Mercenary Sprue.
I thought about accenting his armor with a brass or gold color but the character really isn’t one for embellishment. I’m pleased with him overall, thought he needs a little touch up before his final sealing. I also used Stern here to test the “Advanced Faces” painting guide in issue 23 of No Quarter Magazine. The technique turned out ok for a first attempt but I need to experiment some more before I’m comfortable with it.
Reaper 3324, Stern Kestrelmen
Next is our party arcanist. For this figure I went with a bright fantasy-esque fiery theme to match his flavor of magic and his temper. I had initially painted his inner robe yellow but it looked too much like a rain slicker. I repainted it in the gray you see here to try and evoke a little smoke to the robe’s fiery color.
Valdarynn probably needs the most work out of all of these models before getting “finished” – his hands need highlighting and I have to clean up his fire and smooth out his robe. I’ll probably also add a few highlights to his outer garment. The blond hair turned out fairly well though – I used Reaper Master Series Yellowed Bone (similar to GW Bleached Bone) as a base coat and washed with a thinned down mix of a yellow paint and GW Brown Ink, adding a little more ink in for successive washes to do the deeper shadows.
Reaper 2591, Valdarynn, Arch Mage
After Valdarynn we have the Mercenary Assassin from Confrontation. I picked this figure up a while ago and was holding on to him until I got inspired enough to paint him. When I dug him up while searching through my bare pewter collection for a good figure for my rouge/assassin type character I figured now was as good of a time as any.
I really wanted this figure to have an overall shadowy feel to him, hence the various grays that were used as the primary colors. Even the browns for the leather were done in a muted tone so as to not stand out. I realized that I needed something to make him pop, though and decided to paint the cloth mask a bright red as an accent. Once I clean up a few areas and paint the lantern on his back, the merc assassin will be ready for his final sealing.
Confrontation Mercenary Assassin
Even though I’m posting my merc sprue soldier last, he’s actually the first of the models I did for my game. We had a few of my older figs that stood in for everyone except the axe wielding hedge mage in our group. Before I knew I was going to be picking up a couple Reaper figs, I dug through my bits box for pieces from the Mordheim Mercenary Sprue to put together this model.
I did a quick 2-day speed painting job to get him finished and on the table as quick as possible. The result wasn’t as high of a quality as my other work. If I knew I was going to be painting new figures for most of the party I would have taken more time but he was already completed and sealed before I made that decision. Still, he’s a solid tabletop-quality piece and works well for us in our RPG campaign.
Merc Sprue Soldier
I’m including the last two characters of the group below, even though they’re not new paint jobs. I painted this first figure back in 2003 to use as a priest-type character, the same type of character it’s getting used for now. This was back before I started cutting the broccoli-bases off my Reaper figures – I hate those things.
Reaper 2720, Inquisitor of Malvernis
The archer is another GW Mercenary Sprue figure I put together for my friend’s archer in an Earthdawn game I ran back in 2004. That same player is playing another bow-wielding character in our current group so it seemed fitting to re-use the same figure. He’s from my pre-basing days, so he’s just on a plain black base. One of these days I’ll go back and add some basing to him.
Games Workshop Mercenary Sprue Archer
So that’s it for my current gaming group’s party of characters. We’re trying a few things different this time around with regards to the game itself which are working out for us. I want to talk about them some time in the near future but I’m going to wait until after we get a few more sessions in first.
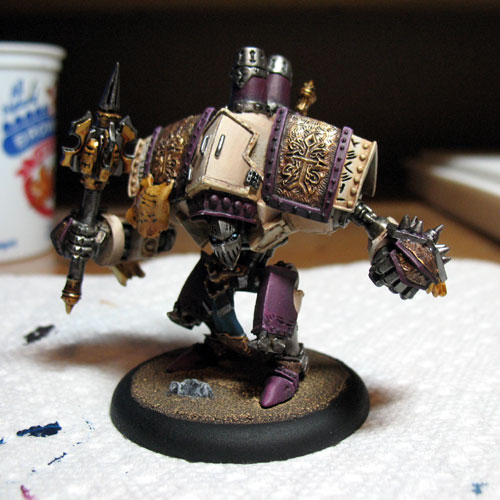
It’s been over half a year since I started my Protectorate of Menoth character warjacks. Working on them quickly degraded from fun to tedious but a couple weeks ago I finally forced myself to sit down and make some actual progress. I’ll finally have them – and Typhon – competed within the next couple days.
Fire of Salvation
First up is the Fire of Salvation. One of my biggest complaints of the Guardian warjack is the engraved metallic shoulder plates. When I saw the Fire of Salvation shared that design I was disappointed – I just don’t like the way it looks. I thought about greenstuffing over them and smoothing them out but decided against it at the last minute.
My other issue was with the fire that was sculpted on the top of the mace. I’m not a big fan of painted fire, so I got rid of it, but that left the mace looking like it was missing something. After digging through my bits box I decided that since the Fire was Kreoss’ jack I’d take a cue from that warcaster’s epic form. I found an old Temple Flameguard spear and clipped the head to attach to the top of the Fire’s mace, making it look like it was designed to share aesthetics with its master’s weapon.
I still need to do a little work on the Fire. On top of a little cleanup, his rivets and the Menofixes on his shoulder need painting. I also have to decide what to do with the “orbs” attached to his collar above his head. Then it’ll be time for sealing.
Blessing of Vengeance
I’ve also made a lot of progress on the Blessing of Vengeance, who is closer to completion than the Fire is. The only real change I made to Blessing was to leave off the banners which affix to the bolts on his shoulders. I’m not a big banner fan, so I tossed them in my bits box with the banners for my Seneschals, Avatar, Guardian, Harbinger, and Epic Kreoss. Sense any trends there?
I’m not completely happy with the posing on this model. His spear doesn’t hang below his base but I can see it potentially being obnoxious on the table. I’m not sure how much I can reposition it without breaking the small pistons that attach his wrist to his forearm though.
Last up is Typhon, who I took a little break from for a while. He’s mostly complete now but I’m not happy with him yet. His mouths just don’t look right and I’m contemplating repainting the stretched skin areas around the bone circle at his cheeks blue like his flesh as opposed to red like his gums.
Typhon
I’m looking into a new photography set up so I can get caught up on documenting my finished works, so hopefully I’ll have some better lit shots of these models soon.